The Stable Diffusion Inpainting Guide
Fix image defects, content-aware filling, retouching, detailing, adding image elements

Share:




 Buy me a Coffee
Images created with artificial intelligence are often anything but perfect: damaged faces, extra legs, missing arms, defective hands, chaotic backgrounds - the inpaint function can be used to fix these defects.

Stable Diffusion Inpainting also allows you to add new objects to the image (generative fill), delete existing objects based on their content (content aware fill) or change the background. This makes the Inpaint module a free alternative to Adobe Firefly.
The Inpaint function can be found under the "img2img" tab.

1. Upload an image
You can send an image that you have created with "txt2img" or "img2img" to the Inpaint function using the "Send to inpaint" button. The prompts and image settings are also transferred at the same time.
If the generated image does not originate from the current session, the easiest way is to import the PNG file under the "PNG" tab and not under "Inpaint". You can drag and drop the file into the field provided or click on "Source" and open the file. The "PNG" function now reads out all the creation data of the file, which you can then pass on to the inpaint function using the "Send to inpaint" button.
Drag all other image files under "inpaint" to the field provided for this purpose (1) or click on the field and open the file on your computer.
2. Select the model (Checkpoint)
As with "txt2img" and "img2img", select the model you want to work with in the top left-hand corner. As a rule, use the same model that you used to generate the image with "txt2img" or "img2img".
If you want to edit an image which is not generated with Stable Diffusion, you should search the Civitai or Huggingface archive for a model (checkpoint) that corresponds to the style of your image source. Download the "saftensors" file and save it in your model directory.
For some checkpoints, a special inpaint model is offered that is optimised for this purpose. In most cases, however, the standard checkpoint provides usable results.
3. The Prompt
In the "Prompt", you describe what is to be displayed on the image and in which style.
To fix image errors or change existing image elements, enter a complete image description here and select the setting "whole picture" as the reference frame under "Inpaint area" (8). If you have created an image with "txt2img" or "img2img", there is already a text that you can change if necessary to create variations.
Accordingly, use the "negative prompt" to describe content, errors and genres that you want to exclude from your image. In this case, however, you mainly use the negative text input to remove or change content from the masked area.
The beach image with the sailboat was created with this prompt:
photo of a sail boat on the sea, smooth surface, view from the beach, palm trees in the front, blue sky, bright daylight, vivid colours

The mask completely covers the boat and its reflection in the water.
To delete the sailboat from the image and fill this area based on content (content aware fill), the term "sail boat" was removed from the prompt and inserted into the negative prompt:
Prompt:
photo of the sea, smooth surface, view from the beach, palm trees in the front, blue sky, bright daylight, vivid coloursnegative prompt:
sail boat
To ensure that the fill refers to the entire environment, in this case the sea and the sky with the clouds, the reference frame under "Inpaint area" (8) must be set to "whole picture".

If you want to add an object to the picture, add more details to existing picture elements or change them significantly, only describe the new object or picture element and select the "only masked" setting as the reference frame under "Inpaint area" (8).
In our beach picture, we could now replace the sailing boat with a fishing boat. As the rest of the image should remain unchanged, we mask the area in which we want to see the boat and set the reference frame under "Inpaint area" (8) to "only masked".
We reduce our prompt to what we want to create in the masked area, i.e:
photo of a white fisher boat on the sea, bright daylight, vivid colours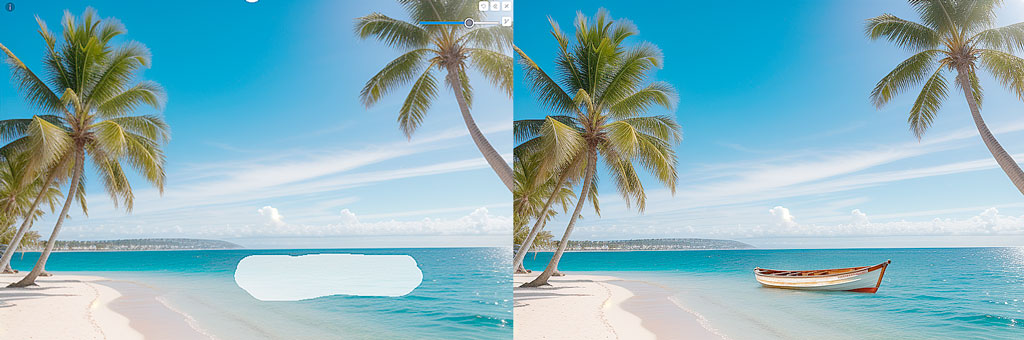
4. Create a mask
Once you have imported an image into the Inpaint workspace, a small circle will appear on the image. This is the brush you will use to create the mask. Click on the pencil button to increase or decrease the brush width.

Use the brush to mark the areas you want to edit. The mask does not have to be drawn very precisely, a rough outline is sufficient. It is important that the surface of the mask is completely closed. It is advisable to change only one detail at a time: e.g. first the background, then the face and finally the hands.
The left button in the toolbar at the top right cancels the last mask action, the eraser removes the mask and the X-button deletes the image source.
Further functions are available via the keyboard shortcuts:
- Alt + mouse wheel: Zoom into the workspace
- Ctrl + mouse wheel: Adjust brush width
- R: Reset zoom
- S: Full screen mode
- F: Move workspace
If drawing the mask in Automatic1111 is too complicated for you, you can also prepare it in a programme such as Affinity Photo, Photoshop, Gimp or online with Photopea and then import it with "Inpaint upload". Inpaint expects a black and white image in the same size as the image source.
5. The edge blur of the mask (Mask blur)

In order to guarantee seamless transitions between the newly created details on the masked area and the rest of the image, the contour of the mask is given a blurred area. The "Mask blur" defines the width of this blurring area in pixels. The default value of 4 pixels is sufficient in most cases. If there are visible transitions between the image elements, you should gradually increase this value.
6. The mask selection (Mask mode)

The "Mask mode" determines which area of the image is to be modified:
- Inpaint masked: The masked area is to be modified.
- Inpaint not masked: The unmasked area is to be edited.
7. The masked content / start value

The "Masked content" setting defines the content with which the calculation will start in the newly generated image area:
- fill: Start generation with the colors of the image
- original: Start generation with the existing mask content
- latent noise: Start generation with random image noise
- latent nothing: Start generation without content
To correct image errors or change existing image elements, generally use the "original" setting. The edited element in the mask area then refers to the content of the entire image.
If you want to insert a new object into the image, the "latent noise" setting is recommended. A completely new image is then created in the masked area.
8. The reference frame (Inpaint area)

The reference frame (Inpaint area) specifies which existing image content should influence the generation of the new image element.
- Whole picture: takes into account the entire environment of the mask. The recalculation of the masked area then includes the existing foreground and background in the calculation for a person with three legs, for example, and replaces the surplus leg with elements in the surroundings. This setting is particularly suitable for large-scale changes or for content-based filling, as shown in the beach image example above.
- Only masked: only takes into account the content of the masked area. This is useful, for example, if you want to insert a new object into the image or make major changes to an image element. In this case, the resolution of the mask is increased to the set image size, the new element is generated and then the resolution is reduced back to the original size. The advantage of this method is that the generated element is displayed in much greater detail than with the "whole picture" procedure. This is helpful, for example, when reworking faces.
Here is another application example for the "only masked" setting:

In this picture, the red shopping bag on the woman's back looks unrealistic and out of place. The left hand is also deformed. It would be difficult to make the shopping bag disappear completely, as it is a conspicuous, central image element. At this point, it would make the most sense to equip the lady with a red rucksack instead.
To do this, we first mask the shopping bag including the handles and restrict ourselves to describing in the prompt only what we want to generate in the mask area:
photo of a red leather rucksack
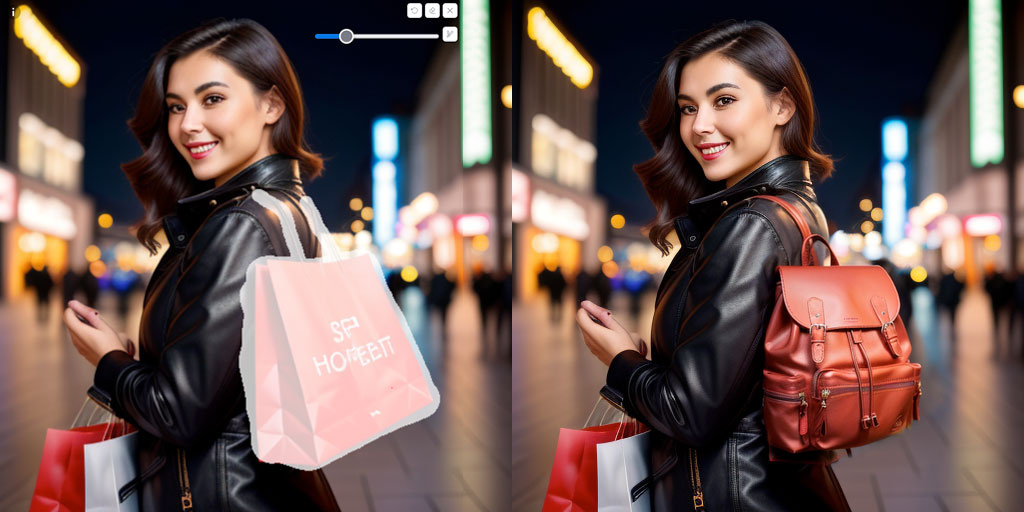
The woman's hand can then be repaired using the same procedure.
9. The reference frame extension (Only masked padding, pixels)
The "Only masked padding" setting only affects the "Only masked" method. As the "Only masked" procedure is only based on the content of the masked area and ignores the rest of the image source, it can happen that the new image element has little relation to the rest of the image and looks like a foreign object.
With the "Only masked padding, pixel" value, the reference frame can be gradually expanded so that the surroundings of the mask have a greater influence on the creation of the new image element.
10. Image count / batch size (Batch count)
The "Batch count" defines how many images are to be generated. As not every image generated with Inpaint provides a usable result, you should create at least 6 variations here.
11. The mixing ratio between text input and random (CFG Scale)
As with img2img image generation, the Classifier Free Guidance Scale (CFG Scale) should be used with caution when generating images with Inpaint. As the CFG Scale determines the extent to which the text input is taken into account during image generation, the "Denoising strength" (12) is the decisive control here.
The larger the CFG Scale, the more random and creative the result. The default value of 7 usually leads to the best results.
12. The mixing ratio between image source and randomness (Denoising strength)
The "Denoising strength" regulates the extent to which the image source is changed. The higher the image noise that is superimposed on the image source at the start of image generation, the greater the changes. Values from 0 - 1 can be set: a value of 0 outputs the original image unchanged. A value of 1 completely ignores the image source and only takes into account the text input to the extent specified by the CFG scale.
As the image source in the masked area is usually to be changed considerably, values between 0.6 and 0.9 are recommended here:
- 0.4 - 0.5: slight change to the image source - helpful for obtaining more detail.
- 0.5 - 0.65: Mild change to the image source - creates slight variations, e.g. for faces or materials.
- 0.65 - 0.75: creative modification of the image source - colors and image composition of the image source are taken into account, but objects are modified to a greater extent.
- 0.75 - 0.9: extensive modification of the image source - colors and image composition of the image source are taken into account, but objects are completely replaced by other image elements.
13. The image origin (Seed)
Each generated image is given an identification number which you can use as a starting value or with which you can restore the image at any time. Depending on the extent to which you want to change or insert new image elements, use the seed of the image source or the random value -1 here.