RuinedFooocus: Image generation with Fooocus and Flux AI

Updated 25.08.2026
Share:




 Buy me a Coffee
"RuinedFooocus" is a fork of the popular "Fooocus" user interface. While the original is optimised for Stable Diffusion XL 1.0 models, "RuinedFooocus" can also process Flux.1 and Flux.2 models, QwenImage, Z-Image Turbo and Stable Diffusion 3.0 and 3.5 models. Particularly helpful when working with Flux AI models: Depending on the model, "RuinedFooocus" automatically downloads all required encoders without the user having to deal with the different dependencies. This makes the user interface suitable for beginners, just like the original.
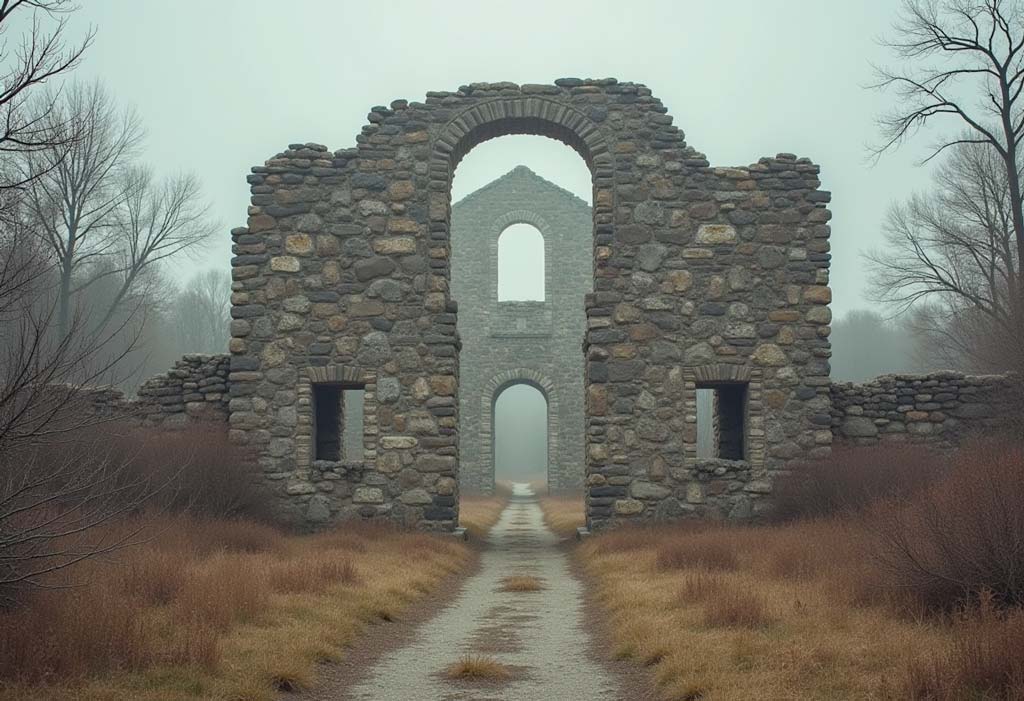
photo of ruinsModel: flux1-dev-fp8
Sampler: Euler
Scheduler: simple
Steps:20
Unfortunately, "RuinedFooocus" is based on an older version of "Fooocus", so you will miss many features such as extensive setting options for the image prompt, automatic masking or Enhance. Instead, the user interface comes with a prompt generator, a slimmed-down image prompt and a thumbnail gallery of the available models and LoRAs.
Since "RuinedFooocus" marries the WebUIs "Fooocus" and "ComfiUI" under the hood, the installation takes up some space on the hard disc.
Advantages and disadvantages of Ruined Fooocus:
+ easy installation
+ compatible with NVIDIA 50xx graphics cards
+ processes Flux.1 and Flux.2 models
+ automatic download of encoders for Flux.1 and Flux.2 models
+ processes QwenImage models
+ processes Z-Image Turbo models
+ processes Stable Diffusion 3.0 and 3.5 models
+ model and Lora Merging
+ WAN and Hunyuan Video
+ Thumbnail overview for models and LoRAs
- outdated Fooocus version
- many popular image prompt functions are missing
- no automatic masking
- no function to enhance image elements
- not compatible with all Flux.1 models
- no direct upscaling
System requirements for RuinedFooocus
- Windows 10 or 11
- 40 GB free hard drive space
- 8 GB RAM memory
- At least: separate NVIDIA graphics card with 4 GB VRAM (6 GB recommended) or AMD graphics card with 8 GB VRAM (see below)
Fooocus was primarily written for Windows and NVIDIA graphics cards. Installation on other operating systems such as Linux or Mac is possible, but requires additional steps. The necessary customisation for AMD graphics cards can be found under "Configuring Fooocus for AMD graphics cards".
Due to the lack of an AMD graphics card, I was unable to test the above instructions.
RuinedFooocus installation under Windows
Step 1: Downloading the installation file
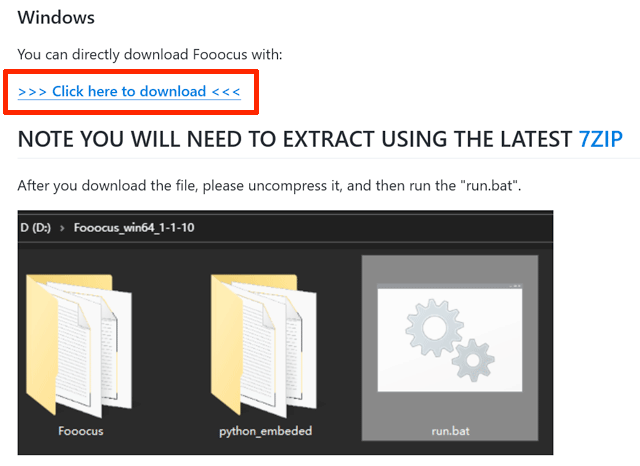
To install RuinedFooocus on Windows, download the latest 7ZIP file win64_*.7z from the RuinedFooocus website https://github.com/runew0lf/RuinedFooocus on Github (1.6 GB).
Step 2: Installing the user interface
Unzip the file, e.g. with the 7ZIP or WINRAR program into a directory of your choice. After unpacking, the user interface is fully installed. The file "run.bat" should now be available in your installation directory.
Step 3: Installing the models
As soon as you start RuinedFooocus, the SDXL 1.0 base model is automatically downloaded. A model - called a "model" or "checkpoint" - contains the data from which the images are generated. There are finetuned models that lead to significantly better results. For example, the original Fooocus user interface works with the Juggernaut model by default. You now have several options:
- You already have the file "sd_xl_base_1.0_0.9vae.safetensors" (SDXL 1.0 base model) on your computer:
copy this file into the RuinedFooocus model directory "YourInstallationDirectory/Fooocus/models/checkpoints" and spare yourself the download. - You do not want to use the SDXL 1.0 base model and want to download a different model instead:
Open the file "YourInstallationDirectory/Fooocus/settings/settings.json and change the safetensors file name after "base model:", e.g. "sd_xl_base_1.0_0.9vae.safetensors" to "juggernautXLByRundiffusion.safetensors".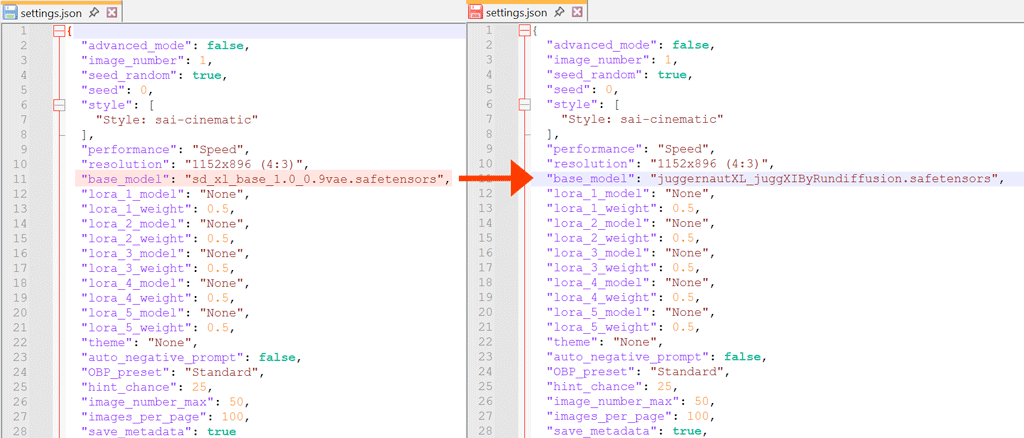
- You have already installed the original version of Fooocus or would like to use the models from the installation of another user interface:
In principle, you could simply copy the models into the model directory of RuinedFooocus, but you will lose space on your hard drive unnecessarily. Instead, you can open the file "YourInstallationDirectory/Fooocus/settings/paths.json" and adjust the directory path after "paths_checkpoints".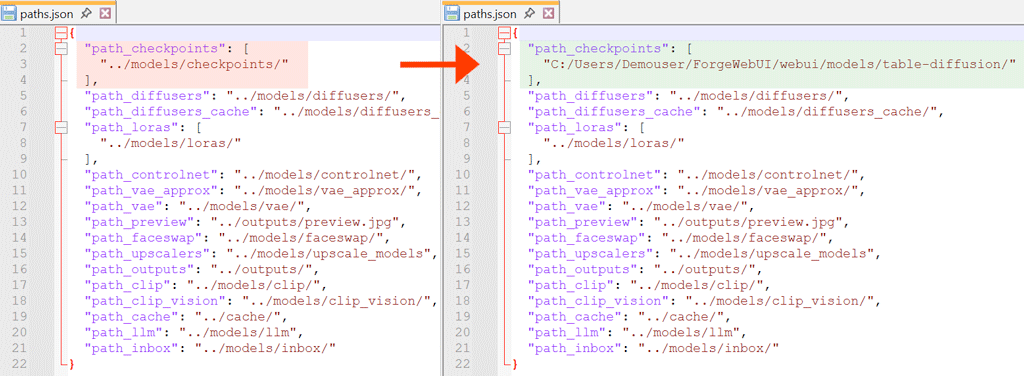
If the SDXL model "sd_xl_base_1.0_0.9vae.safetensors" is not located in this directory, you should change the base model for RuinedFooocus as described under b). - You want to start with the SDXL 1.0 model: In this cas you do not need to do anything.
The above-mentioned settings for the model directory and the base model can also be adjusted in the user interface under the "Settings" tab.
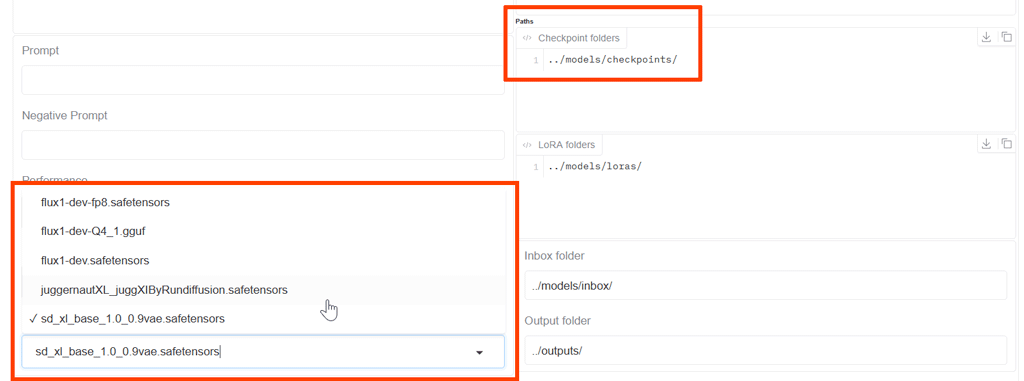 Now double-click on the "run.bat" file. Depending on the settings you have made above, a model will now be downloaded and RuinedFooocus will start automatically in your default web browser. You can start immediately.
Step 4: Generate images
To exit RuinedFooocus, close the browser window and the Windows terminal window. To restart, double-click on the "run.bat" file. The RuinedFooocus user interface opens in your web browser.
 The generated images appear in the upper field. Below this you will find a text input field iwhere you can enter your "prompt", i.e. what you want to see on your image. You can find detailed instructions on how to create stable diffusion prompts here: The Stable Diffusion Prompt for Perfect Images.
An overview of how to use the Fooocus user interface can be found at: The Stable Diffusion Fooocus Guide: Getting Started. However, you will miss some functions in RuinedFooocus, while others have been added.
RuinedFoocus saves the results in the "output" folder in your Fooocus directory(your installation directory/Fooocus/outputs/). Below the single image display you will also find a download button for saving your image.
Generating images in RuinedFooocus with Flux AI models
To generate images in the RuinedFooocus user interface with Flux.1 models, you must download an appropriate model and save it in the directory "YourInstallationDirectory/Fooocus/models/checkpoints". A detailed overview of the different models, the encoders that may be required and their requirements for your computer can be found in the Flux AI guide: installation, models, prompts and settings.
You can read instructions on how to work with Flux.2 models in RuinedFooocus here: The Flux.2 Guide – Part 2: Installation, Settings, How It Works. The Flux.2 Guide - Part 1: Applications, Models, Prompts, Issues shows you how to control objects, image composition, and styles using text or image prompts.
Here is another quick overview of the Flux.1 basic models as a PDF download:

If you want to get started right away without delving deeper into the topic, I recommend downloading the Flux.1 [dev] NF4 model (12 Gb) and saving it in the directory "YourInstallationDirectory/Fooocus/models/checkpoints". The model already contains all the necessary encoders and should be able to cope with a graphics card memory of 6 Gb or more.
A list of other Flux.1 models that are compatible with RuinedFoocus can be found on the RuinedFooocus Github page.
Select a Flux model
Select an appropriate Flux.1 model under the "Models > Model" tab. If your downloaded model is not displayed, click the "Refresh All Files" button below the overview.
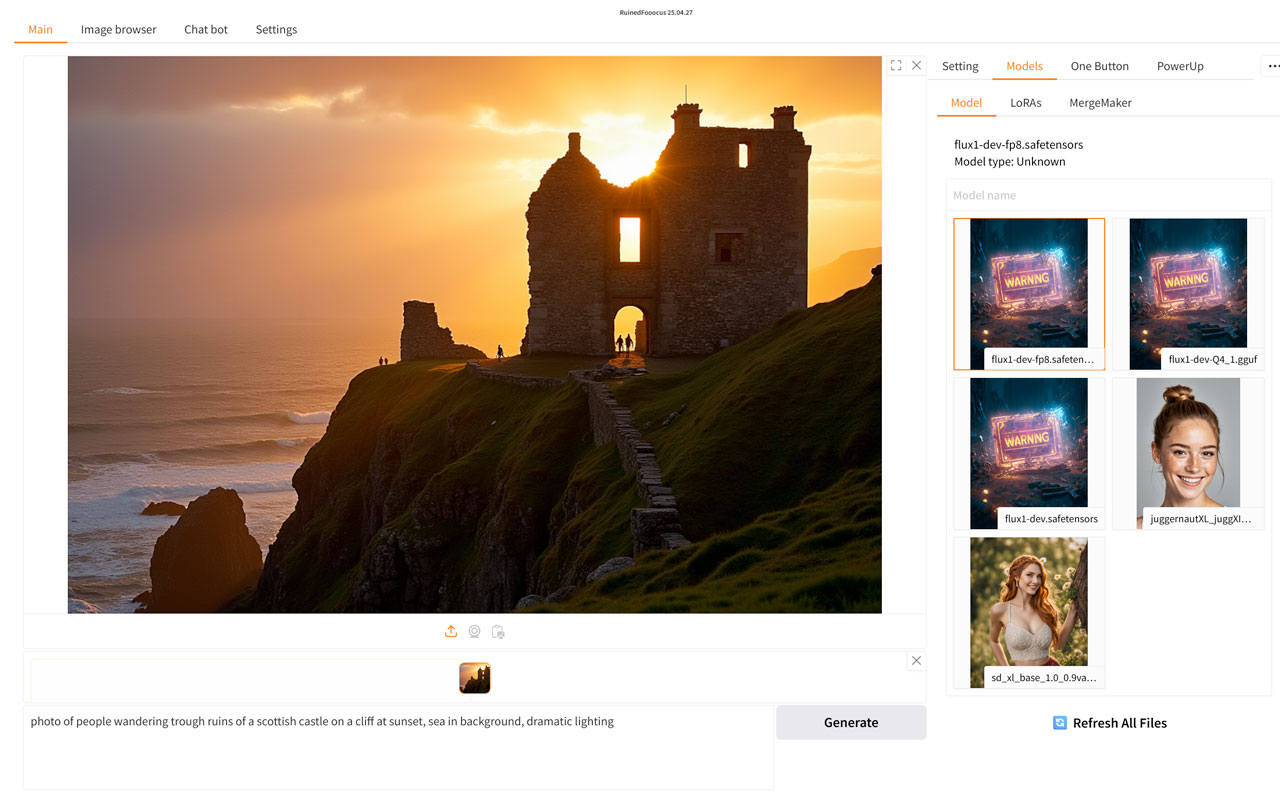
Ruined Fooocus settings for Flux AI models:
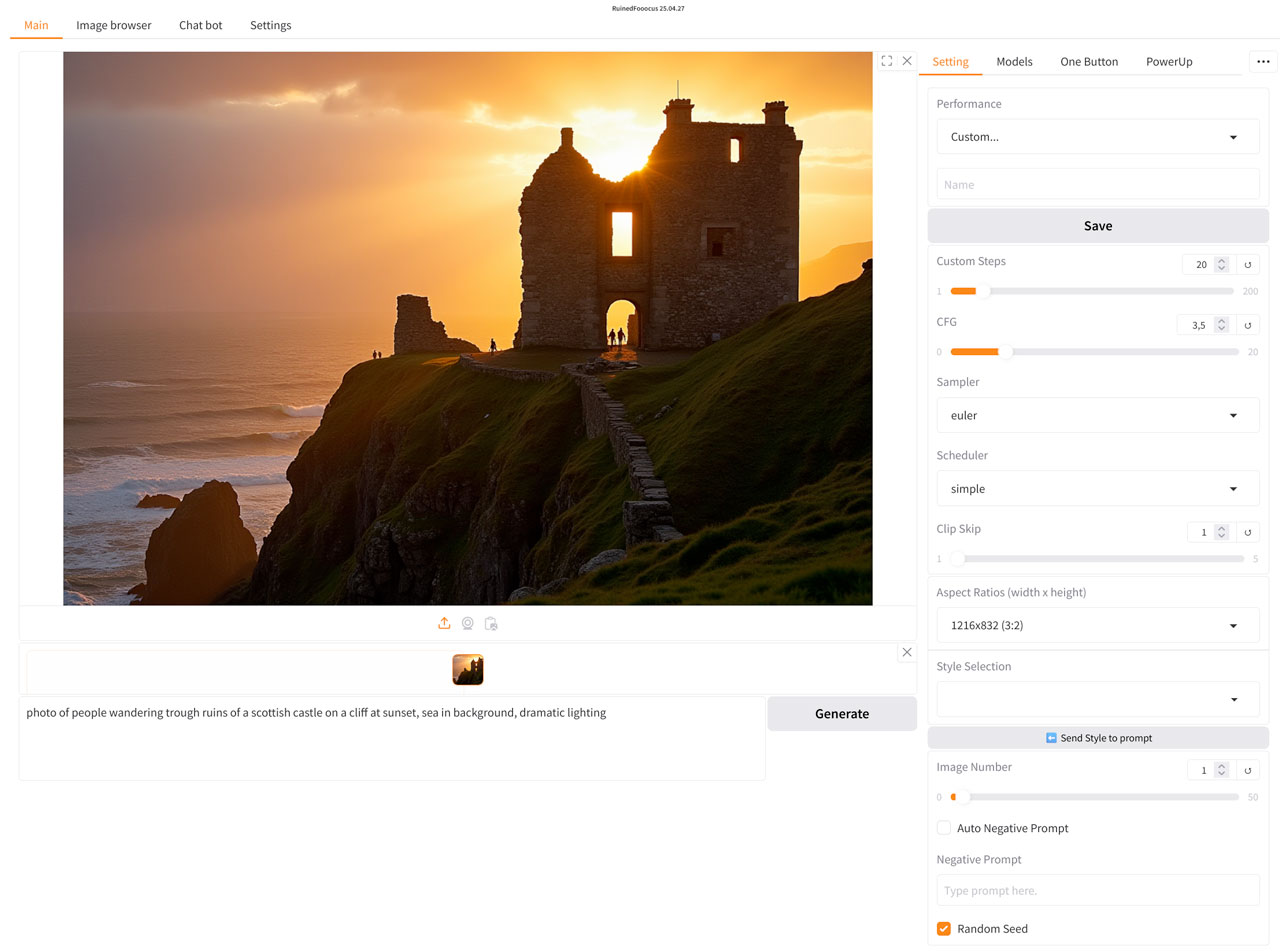
To create images with Flux.1 models, you should adjust some settings under the "Setting" tab: The "Presets" and "Style" settings remain empty.
Performance
If you select the "Custom..." option under Performance, the settings that you should adjust depending on the model you are using will appear below the selection.
Settings for Flux.1 [dev]:
- Custom Steps: 20-30
- CFG: 3.5
- Sampler: Euler
- Scheduler: simple
- Clip Skip: 1
Settings for Flux.1 [schnell]:
- Custom Steps: 4-8
- CFG: 1
- Sampler: Euler
- Scheduler: simple
- Clip Skip: 1
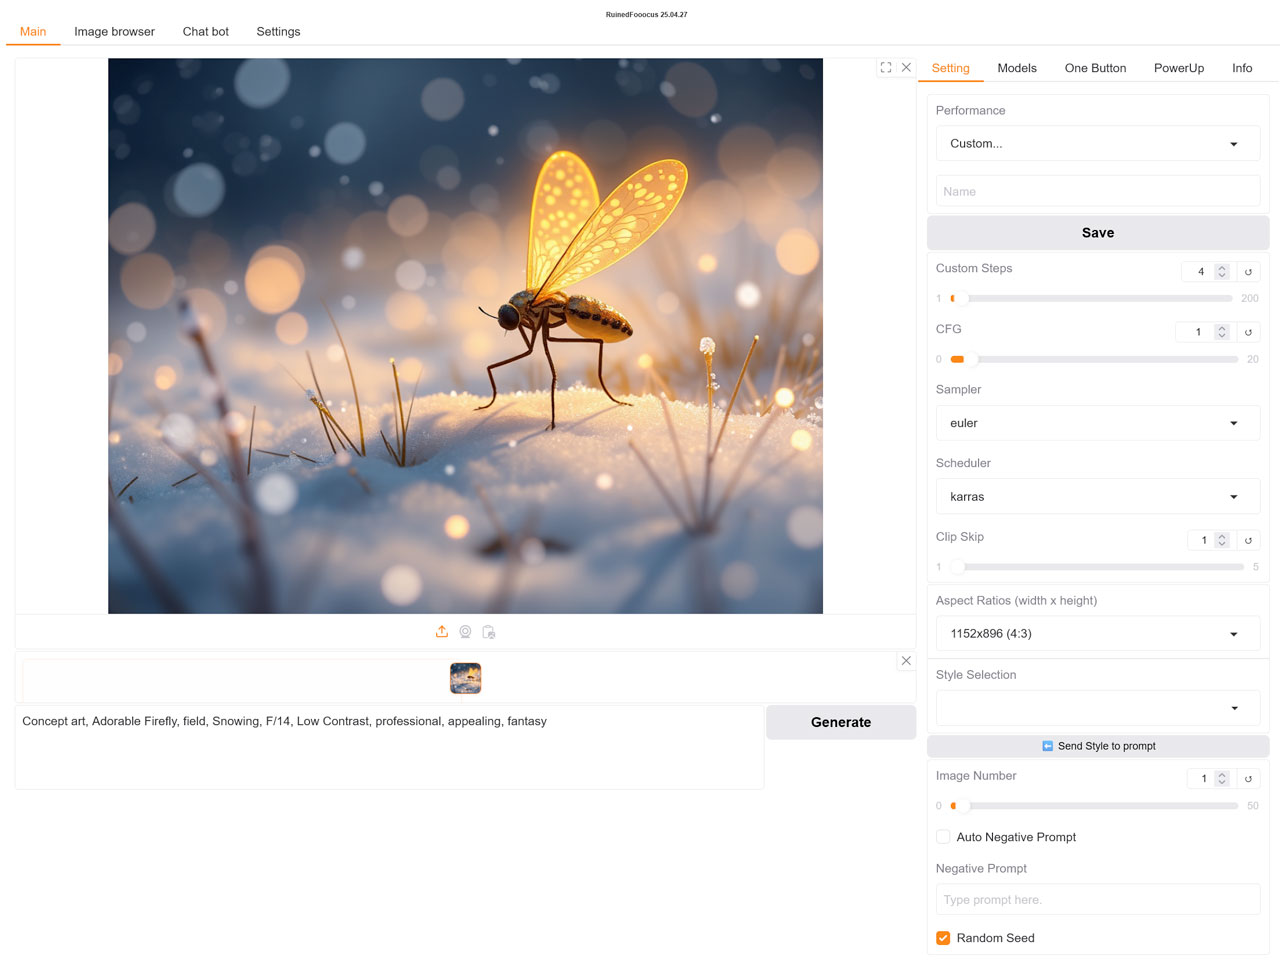
You can save your settings with the "Save" button.
An overview of the samplers and schedulers that you can use for Flux.1 models is provided by "Coffeevectors" on Civitai.
RuinedFooocus, Flux.1 and ClipL, T5 and VAE encoders
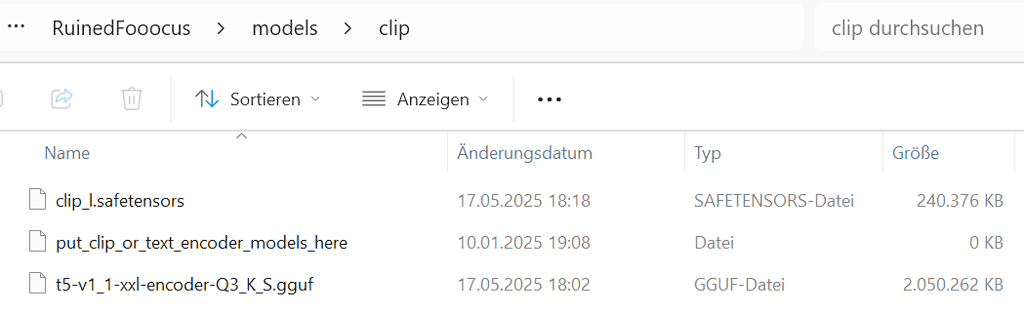
Some Flux AI models, such as GGUF files, require additional text and VAE encoders to generate images. RuinedFooocus automatically downloads the required files and integrates them into the process. RuinedFooocus uses the relatively slimmed-down Q3 version by default as a T5 text encoder, i.e. the encoder that interprets continuous text.
If you want to use a more sophisticated version, you can select one of the T5 encoders suggested under "Settings > clip_t5".

The quantisation of the encoder should ideally correspond to the quantisation of the model (e.g. T5-Q5 for a Q5.gguff model). The encoders are saved in the directory "Your installation directory/Fooocus/models/clip".
Generating images in RuinedFooocus with Stable Diffusion SD 3.0 and SD 3.5 models
To generate images in RuinedFooocus with an SD3.0 model, you should download the checkpiont sd3_medium_incl_clips.safetensors from Huggingface.co and save it in the directory "YourInstallationDirectory/Fooocus/models/checkpoints". As SD3.5 model you can download the checkpoint sd3.5_medium.safetensors. You need a Huggingface-Accoount for both models.
Under Settings > Performance, select "Custom..." and make the following settings:
- Steps: 30
- CFG: 4-6
- Sampler: dpmpp_2
- Scheduler: sgm_uniform
- Clip skip: 1
Alternatively, you can also use the "Euler" sampler and the "simple" scheduler.
LoRAs in RuinedFooocus
LoRAs (Low-Rank Adaptation) are mini-models (2-200 MB) that have been trained for individual tasks and extend the basic models. For more information about LoRAs, how to download and use them, see Part 1 of the Fooocus User Interface Guide.
If you have downloaded LoRAs from Civitai to the "Your installation directory/Fooocus/models/lora" directory, they will appear as a thumbnail together with the associated "Trigger Words" in the overview under the "Models > LoRAs" tab. Click on + below the list to select a LoRA. You should also insert the above-mentioned "Trigger Words" into your prompt. This will ensure that the LoRA influences the image generation.
Interesting features in Ruined Fooocus
Reading generation parameters / metadata
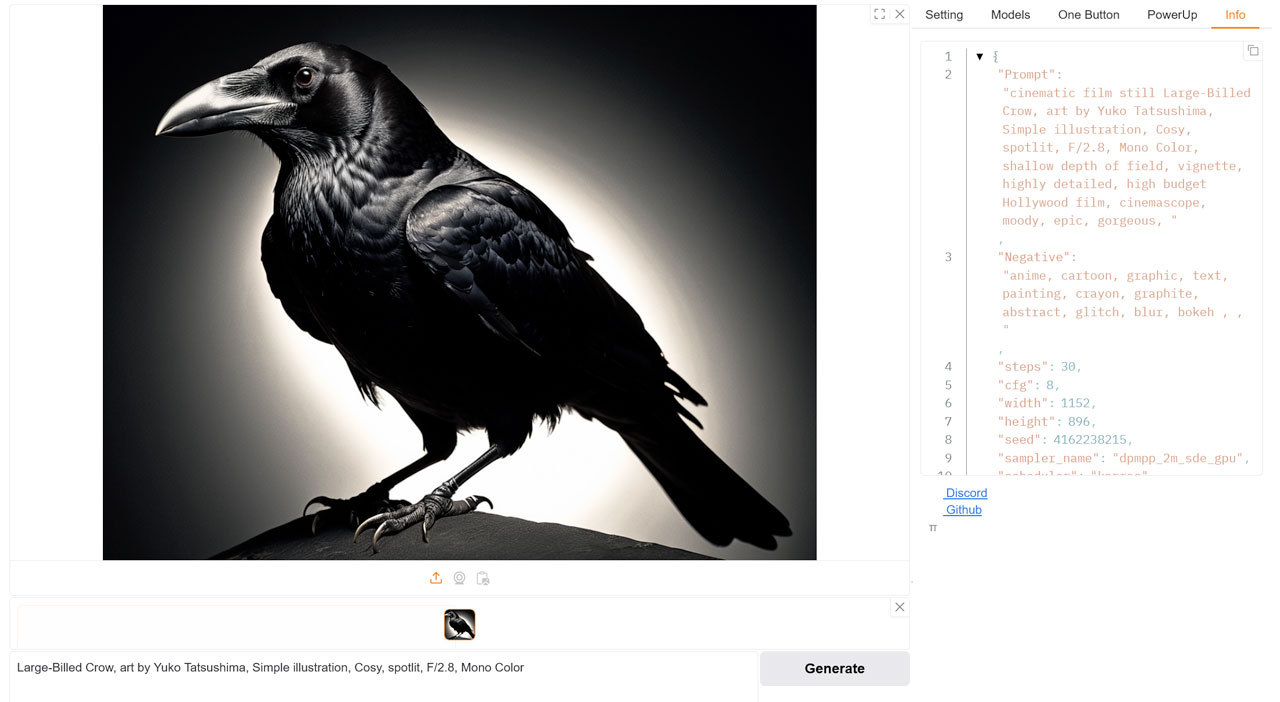
If you drag and drop an image that you have generated with RuinedFooocus onto the image area, RuinedFooocus reads the generation parameters such as prompt, model and settings and transfers them to the user interface.
Create text prompt from image (Clip Interrogator)
If you drag and drop any image onto the image area, RuinedFooocus will analyse the image and create a text prompt with an image description.
Autonegative Prompt
The Autonegative Prompt function inserts a pre-formulated, negative prompt into the corresponding text field to improve the image quality.
Prompt Generator (One Button)
You can use the Prompt Generator to generate random text prompts. This is particularly useful for familiarising yourself with the topic of prompting or carrying out quick tests. "Instant OBP" starts the image generation immediately with a random text prompt.

"Random Prompt" only enters the prompt into the text field, allowing changes and additions to be made. Under "One Button Preset" you can select subject areas such as portraits or landscapes.

The "Hyper Prompt" function creates a narrative, "natural" text.
Image prompt (Power Up)
As RuinedFoocus is based on an older version of Fooocus, the extensive image prompt functions offered by Fooocus 2.5 are missing.
Under the "Power Up" tab, you can apply functions such as image-to-image generation (img2img), inpainting, upscaling, canny etc. to one image prompt at a time. Select "Cheat Code > Custom..." to change the default settings. Power Up only works with SDXL models. Here is an example of the inpainting function:
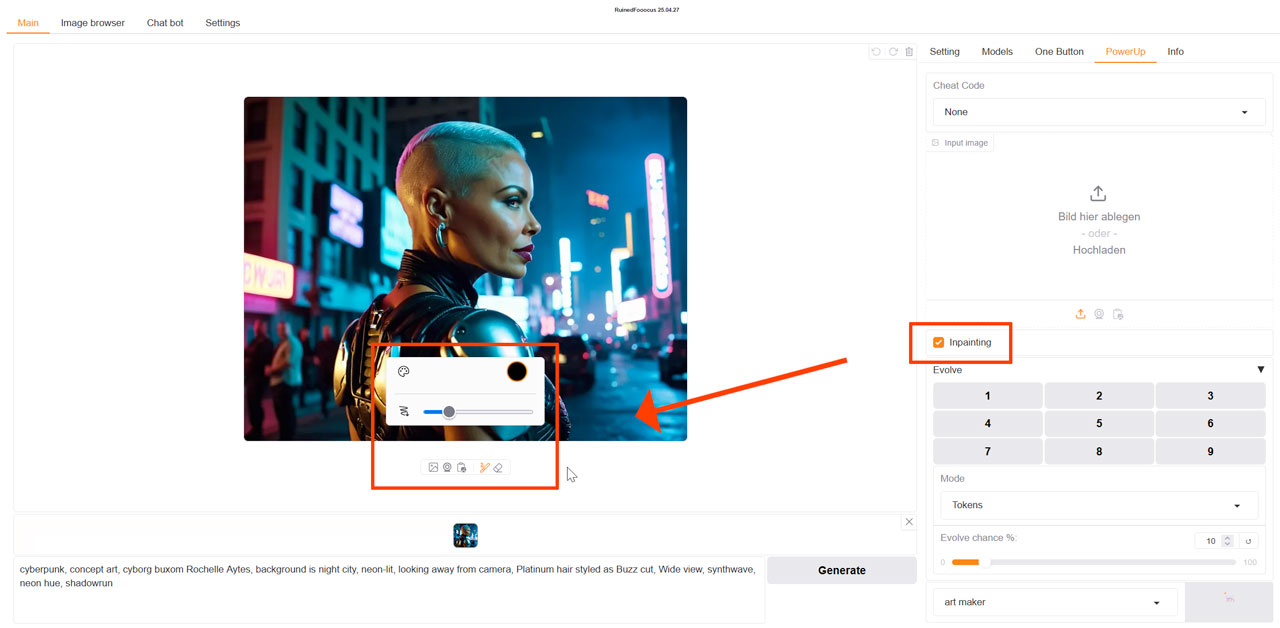
Image Browser
Under the "Image Browser" tab you will find an overview of the images that you have generated with RuinedFooocus. Click on "Update DB" to update the database.
